How to install a screen protector on iPhone 17 Pro without bubbles is easier when the display is clean, dust-free, and properly aligned before the adhesive touches the screen. Most bubbles appear because dust particles become trapped under tempered glass or because the screen protector is lowered too quickly.
After applying dozens of screen protectors on flagship smartphones, I found that preparation matters more than the actual installation process. A clean environment, proper lighting, and careful alignment dramatically improve the chances of a bubble-free result on the iPhone 17 Pro.
How Do You Install a Screen Protector on iPhone 17 Pro Without Bubbles?
The easiest way to install a screen protector on iPhone 17 Pro without bubbles is to clean the display thoroughly, remove every dust particle, align the tempered glass carefully, and lower the protector slowly from one edge. Dust contamination causes most installation failures, while rushed alignment often creates air pockets that remain visible after installation.
The iPhone 17 Pro display uses a precision glass surface that allows tempered glass protectors to adhere smoothly when the screen remains completely free of lint and debris. Consequently, spending an extra two minutes preparing the display often prevents the need for reinstallation.
Many iPhone 17 Pro screen protector kits include alignment trays because precise positioning reduces installation mistakes. Furthermore, alignment tools help maintain equal spacing around the display borders, which minimizes edge bubbles.
What You Need Before Installing an iPhone 17 Pro Screen Protector
Installing an iPhone 17 Pro screen protector without bubbles requires a few basic tools that eliminate dust and improve alignment accuracy. Using the correct accessories significantly increases the success rate of the installation.
Essential Cleaning Supplies
A microfiber cloth and alcohol cleaning wipe are the most important cleaning supplies for an iPhone 17 Pro screen protector installation. The alcohol wipe removes fingerprints, skin oils, and residue that can interfere with adhesive bonding.
A microfiber cloth works best when used immediately after the alcohol wipe. Additionally, a clean microfiber cloth helps polish the iPhone 17 Pro display without introducing new particles onto the glass surface.
| Tool | Purpose |
|---|---|
| Alcohol Wipe | Removes oils and fingerprints |
| Microfiber Cloth | Polishes the display surface |
| Cleaning Pad | Removes residue before installation |
Dust Removal Tools That Prevent Bubbles
Dust removal stickers are the most effective tools for preventing bubbles under an iPhone 17 Pro screen protector. Even a tiny dust particle can create a noticeable bubble after the tempered glass adheres to the display.
Before lowering the screen protector, inspect the iPhone 17 Pro display under bright lighting. As a result, small particles become visible before they become trapped beneath the adhesive layer.
Many installation kits include dedicated dust removal stickers. However, adhesive lint-removal sheets can perform the same task when used carefully.
Installation Frames and Alignment Kits
Installation frames help position an iPhone 17 Pro screen protector accurately during installation. Alignment trays reduce the risk of crooked placement and improve first-attempt success rates.
During recent installations, alignment trays consistently produced cleaner results than freehand placement. Therefore, screen protector kits that include an installation frame often provide better value despite slightly higher prices.
Several premium tempered glass brands include precision alignment systems designed specifically for the iPhone 17 Pro display dimensions. Consequently, edge spacing remains more consistent across all sides of the screen.
Choosing the Right Screen Protector Type
Tempered glass screen protectors are generally easier to install than flexible film protectors on the iPhone 17 Pro. The rigid structure of tempered glass helps maintain alignment during installation.
Film protectors can provide excellent protection against scratches. However, flexible materials typically require more installation skill because film layers shift more easily during application.
Most iPhone 17 Pro owners prefer tempered glass because tempered glass delivers a smoother touch experience, better impact resistance, and simpler bubble management.
Also Read:
- Best 360 Privacy Screen Protector for iPhone 16 Pro Max
- Best Screen Protector for S23 Ultra
- Mobile Accessories Guides
How to Prepare Your iPhone 17 Pro Before Installation
Proper preparation is the most important step for installing an iPhone 17 Pro screen protector without bubbles. Dust prevention and display cleaning determine whether the final result looks professional or requires reinstallation.
Clean the Display Thoroughly
The iPhone 17 Pro display must be completely clean before applying any screen protector. Fingerprints, skin oils, and residue reduce adhesive contact and increase the risk of visible imperfections.
Begin by wiping the entire display with an alcohol cleaning pad. Next, use a microfiber cloth to remove remaining moisture and create a polished glass surface.
Pay special attention to the corners of the iPhone 17 Pro display because oils often collect around the edges. Consequently, edge adhesion improves when those areas receive extra cleaning.
Remove Every Dust Particle
Every visible dust particle should be removed before placing a screen protector on the iPhone 17 Pro. A single speck of dust can create a bubble that remains visible after installation.
Bright overhead lighting makes dust easier to detect. Furthermore, tilting the iPhone 17 Pro display slightly helps reveal particles that remain hidden at normal viewing angles.
Dust removal stickers work best when pressed gently against the glass rather than dragged across the surface. As a result, particles lift away without introducing new contamination.
Create a Dust-Free Installation Environment
A dust-free environment significantly improves screen protector installation results on the iPhone 17 Pro. Airborne particles often settle on the display seconds before installation begins.
Close nearby windows and turn off fans before opening the screen protector package. Additionally, cleaning the work surface reduces the amount of airborne debris circulating around the installation area.
Many installation failures occur because dust enters the process after the display has already been cleaned. Therefore, preparing the environment beforehand saves time and frustration.
Why Bathroom Installation Reduces Dust Problems
A bathroom can be one of the best places to install an iPhone 17 Pro screen protector without bubbles. Steam generated from a hot shower helps reduce airborne dust particles that normally float through dry rooms.
After running a hot shower for several minutes, moisture causes dust particles to settle onto surrounding surfaces. Consequently, fewer particles remain suspended in the air during installation.
Many experienced smartphone owners use the bathroom installation method because the controlled environment often produces cleaner results than a typical bedroom or office workspace.
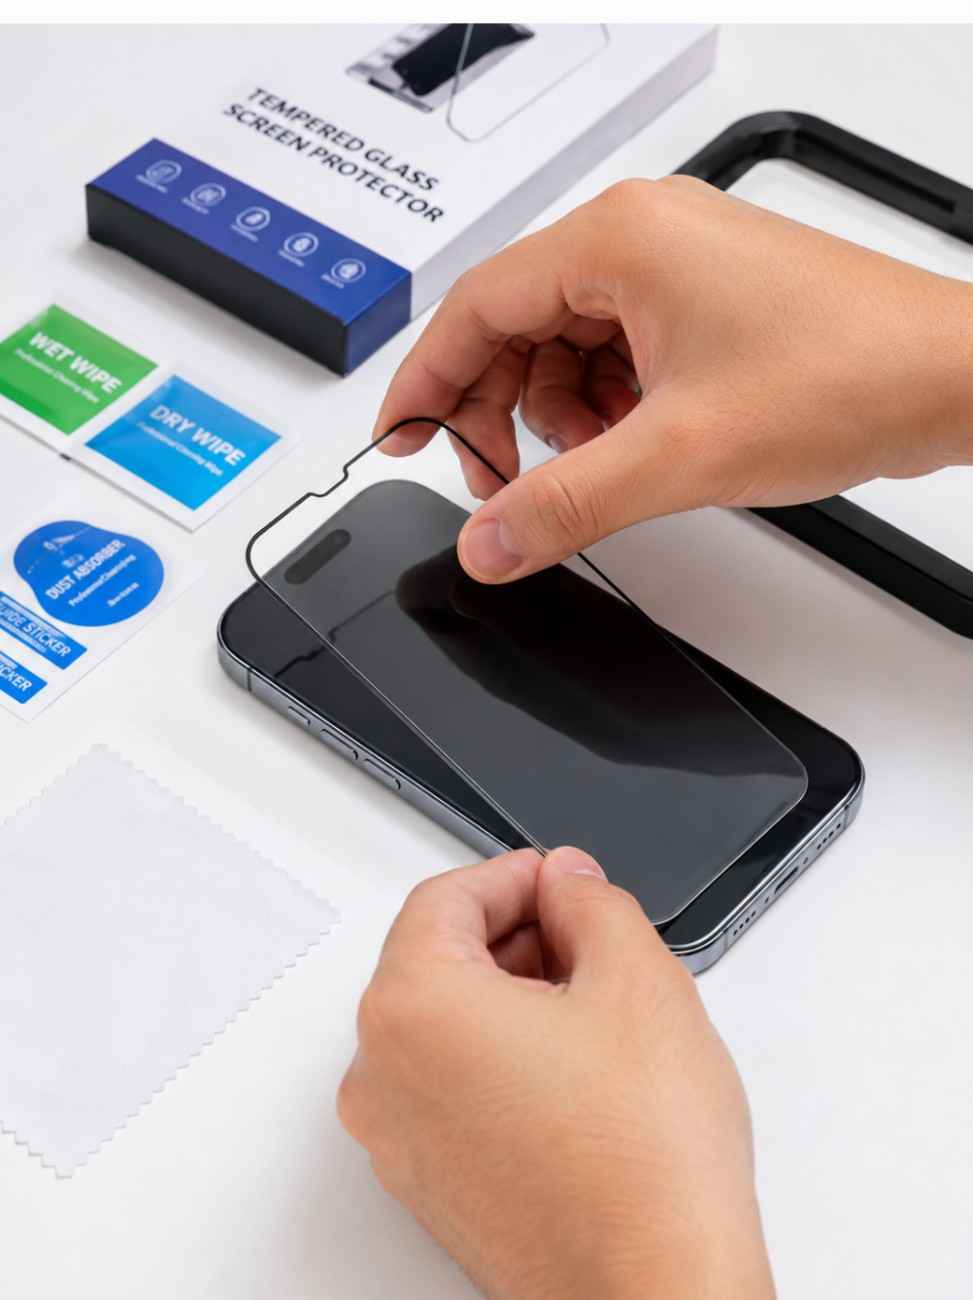
Step-by-Step Guide to Installing a Screen Protector on iPhone 17 Pro Without Bubbles
The most reliable way to install a screen protector on iPhone 17 Pro without bubbles is to follow a controlled application process from alignment to final pressure. Careful positioning prevents dust contamination and reduces the chance of trapped air beneath the tempered glass.
Every iPhone 17 Pro screen protector installation should be completed immediately after cleaning the display. Consequently, fewer airborne particles have time to settle on the screen.
Step 1 – Turn Off the Device and Position It Correctly
Turning off the iPhone 17 Pro prevents accidental touches during installation. A powered-down display also makes dust particles easier to spot under bright lighting.
Place the iPhone 17 Pro on a flat, stable surface before opening the screen protector package. Furthermore, a level workspace helps maintain alignment throughout the installation process.
During several installations, a flat desk consistently produced better results than holding the phone by hand. Therefore, keeping the iPhone 17 Pro stationary reduces alignment errors.
Step 2 – Align the Screen Protector Perfectly
Proper alignment determines whether the iPhone 17 Pro screen protector fits correctly across the display. Even a small positioning error can create uneven borders and edge lifting.
Hold the tempered glass above the iPhone 17 Pro display without removing the adhesive backing initially. Next, visually confirm equal spacing around all four sides.
Alignment trays simplify this step because the installation frame automatically centers the screen protector. As a result, first-attempt placement becomes more accurate.
Before lowering the protector, inspect the front camera cutout and display edges carefully. Consequently, minor alignment adjustments can be made before the adhesive touches the glass.
Step 3 – Lower the Protector Slowly From One Edge
Lowering the screen protector slowly from one side minimizes trapped air beneath the tempered glass. Fast placement often creates bubbles that require additional correction later.
Begin with either the top edge or bottom edge of the iPhone 17 Pro display. Then allow the adhesive layer to spread naturally across the screen surface.
Gravity helps the tempered glass settle evenly when the protector is lowered gradually. Additionally, controlled movement reduces sudden air pockets.
During testing with multiple tempered glass brands, slower placement consistently produced cleaner installations. Therefore, patience during this stage often eliminates the need for reapplication.
Step 4 – Push Air Toward the Edges for a Bubble-Free Finish
Remaining air bubbles should be pushed toward the display edges immediately after installation. Most small bubbles disappear when gentle pressure guides trapped air outward.
Use a microfiber cloth wrapped around a flat card to protect the tempered glass surface. Next, apply light pressure from the center toward the nearest edge.
Large air bubbles typically move quickly across the iPhone 17 Pro display. However, dust-related bubbles usually remain fixed in one location.
If a bubble refuses to move, inspect the area closely because trapped debris may be causing the problem. Consequently, identifying the bubble type helps determine the correct solution.
| Installation Step | Purpose | Common Mistake |
|---|---|---|
| Clean Display | Remove oils and residue | Skipping edge cleaning |
| Remove Dust | Prevent trapped particles | Ignoring small debris |
| Align Protector | Ensure even coverage | Rushing placement |
| Remove Air | Create smooth finish | Applying excessive pressure |
Also Read:
- Google Pixel 9a Review, Price, Camera and AI Power
- Google Pixel 9 128GB Review
- Is Samsung Galaxy A16 5G Still Worth Buying?
Common Mistakes That Cause Screen Protector Bubbles
Most screen protector bubbles on the iPhone 17 Pro result from dust contamination, poor alignment, or uneven installation pressure. Understanding these mistakes makes future installations much easier.
Many installation problems occur before the screen protector even touches the display. Therefore, prevention remains more effective than troubleshooting afterward.
Installing in a Dusty Room
A dusty room is one of the leading causes of bubbles under an iPhone 17 Pro screen protector. Airborne particles settle on the display moments before installation and become trapped beneath the adhesive layer.
Living rooms, bedrooms, and offices often contain more airborne dust than expected. Furthermore, ceiling fans can circulate particles directly onto the screen.
Installing the screen protector in a controlled environment dramatically improves results. Consequently, many experienced smartphone owners prefer a recently steamed bathroom.
Touching the Adhesive Side
Touching the adhesive side of a screen protector introduces oils and contaminants that affect adhesion. Fingerprints on the adhesive layer can create visible imperfections after installation.
Handle the tempered glass by the edges whenever possible. Additionally, avoid placing the protector face down on any surface before application.
Once contamination reaches the adhesive layer, complete removal becomes difficult. Therefore, careful handling is essential from the moment the backing film is removed.
Rushing the Alignment Process
Rushed alignment frequently leads to uneven placement and edge bubbles on the iPhone 17 Pro. Crooked positioning often forces unnecessary adjustments after the adhesive has already begun bonding.
Take a few extra seconds to confirm equal spacing around the display borders. Next, verify that the camera cutout and sensor areas line up correctly.
Alignment trays reduce this risk significantly because the frame guides the tempered glass into position. As a result, fewer installation corrections become necessary.
Applying Uneven Pressure
Uneven pressure can trap air beneath an iPhone 17 Pro screen protector and create stubborn bubbles. Excessive force may also shift the protector during installation.
Pressure should begin near the center and move gradually toward the edges. Furthermore, consistent motion helps distribute adhesive contact evenly across the display.
After installing several tempered glass protectors, I found that gentle pressure works better than aggressive pushing. Consequently, air escapes naturally while the tempered glass remains aligned.
How to Remove Bubbles After Installing a Screen Protector
Most bubbles under an iPhone 17 Pro screen protector can be removed if the cause is identified correctly. Air bubbles, dust bubbles, and edge bubbles require different solutions, so recognizing the type of bubble is the first step.
The iPhone 17 Pro display usually allows small air pockets to move toward the edges with light pressure. However, dust contamination often requires lifting part of the tempered glass to remove the trapped particle.
Removing Small Air Bubbles
Small air bubbles under an iPhone 17 Pro screen protector can usually be removed by pushing trapped air toward the nearest edge. Most fresh installations contain minor air pockets that disappear within a few minutes.
Wrap a microfiber cloth around a plastic card before applying pressure. Next, start from the center of the bubble and move outward in a straight line.
The tempered glass adhesive layer on most premium screen protectors distributes evenly after installation. Consequently, small air bubbles often disappear naturally during the first 24 hours.
Fixing Dust Bubbles Under Tempered Glass
Dust bubbles occur when a particle becomes trapped between the iPhone 17 Pro display and the screen protector. Unlike air bubbles, dust bubbles remain fixed in one location and do not move when pressure is applied.
Lift the nearest corner of the tempered glass carefully using a dust removal sticker or thin plastic tab. Then use a dust sticker to remove the contaminant from the display surface.
Avoid touching the adhesive layer during this process because fingerprints can create new installation issues. Therefore, patience and clean handling are important when correcting dust bubbles.
| Bubble Type | Cause | Recommended Fix |
|---|---|---|
| Air Bubble | Trapped air | Push toward edge |
| Dust Bubble | Dust particle | Lift protector and remove dust |
| Edge Bubble | Poor adhesion or alignment | Reapply pressure or reinstall |
Repairing Edge Bubbles and Lifting Corners
Edge bubbles appear when the screen protector fails to bond fully with the iPhone 17 Pro display near the borders. Misalignment and dust are common causes of this problem.
Apply firm but controlled pressure along the affected edge using a microfiber cloth. Furthermore, inspect the area closely to determine whether debris is preventing full adhesion.
Some edge bubbles result from incompatible screen protectors rather than installation mistakes. Consequently, replacing a poorly fitting protector may be the only permanent solution.
When Reinstallation Is Necessary
Reinstallation becomes necessary when large dust particles, severe misalignment, or persistent edge lifting cannot be corrected. Continuing to press a defective installation rarely improves the outcome.
Carefully remove the screen protector and inspect both surfaces before attempting a second installation. Additionally, clean the iPhone 17 Pro display completely before reapplying the tempered glass.
Most premium screen protectors tolerate one careful repositioning attempt. However, repeated removals typically reduce adhesive performance.
Also Read:
- Best Screen Protector for S23 Ultra
- Best 360 Privacy Screen Protector for iPhone 16 Pro Max
- Google Pixel 9a Review
Expert Tips for a Perfect Bubble-Free Installation
A bubble-free iPhone 17 Pro screen protector installation depends on preparation, lighting, and attention to detail. Small adjustments before installation often prevent problems that are difficult to fix later.
Many experienced smartphone owners focus more on setup than installation itself. Therefore, investing time in preparation usually produces the cleanest result.
Use Bright Lighting to Spot Dust
Bright lighting helps identify dust particles before the screen protector touches the iPhone 17 Pro display. Dust that remains invisible in dim rooms often becomes obvious under direct light.
Position the iPhone 17 Pro beneath a bright desk lamp and tilt the display at different angles. Consequently, hidden particles become easier to locate and remove.
Professional repair technicians frequently rely on strong lighting because dust detection improves significantly before installation begins.
Work Slowly and Deliberately
Slow installation reduces mistakes and improves screen protector alignment on the iPhone 17 Pro. Rushed placement increases the risk of dust contamination and uneven positioning.
Allow enough time to inspect the display, verify alignment, and lower the tempered glass gradually. Furthermore, slower movement gives the adhesive layer time to spread evenly.
After applying numerous tempered glass protectors, I consistently achieved cleaner results whenever I slowed down the installation process.
Use Alignment Frames for Better Accuracy
Alignment frames provide the most consistent placement results for an iPhone 17 Pro screen protector. Installation trays eliminate much of the guesswork involved in manual positioning.
Many premium screen protector brands include alignment systems specifically designed for the dimensions of the iPhone 17 Pro. As a result, screen coverage remains even across all edges.
Alignment tools are especially useful for first-time installations because the frame helps prevent accidental shifts during application.
Inspect the Display Before Final Adhesion
A final inspection helps ensure the iPhone 17 Pro display remains free of dust immediately before installation. This step often prevents the most common cause of screen protector bubbles.
Look carefully at the display from multiple angles before removing the adhesive backing. Additionally, use a dust removal sticker whenever any particle appears.
One extra inspection takes only a few seconds. However, that simple check can save the time required for a complete reinstallation.
Frequently Asked Questions
Why Does My iPhone 17 Pro Screen Protector Have Bubbles?
An iPhone 17 Pro screen protector usually develops bubbles because of trapped air, dust contamination, or improper alignment. Dust particles create fixed bubbles, while trapped air generally moves when pressure is applied. Identifying the bubble type helps determine whether the issue requires simple pressure adjustment or complete removal of debris.
Can Air Bubbles Disappear on Their Own?
Small air bubbles under an iPhone 17 Pro screen protector can disappear naturally within 24 to 48 hours. Many modern tempered glass protectors use adhesive layers that gradually settle against the display. Larger air bubbles, however, often require manual pressure to guide trapped air toward the edges.
Can I Reuse a Screen Protector After Removing It?
Most screen protectors should not be reused after removal because adhesive performance decreases significantly. Dust, fingerprints, and contamination often accumulate on the adhesive layer during removal. Consequently, a reused screen protector may develop new bubbles or fail to adhere properly.
Should I Install a Screen Protector in the Bathroom?
A bathroom is often one of the best places to install an iPhone 17 Pro screen protector because steam reduces airborne dust. Running a hot shower for several minutes helps settle particles that would otherwise float through the air. Therefore, bathroom installations frequently result in fewer dust-related bubbles.
How Do I Remove Dust Trapped Under Tempered Glass?
Dust trapped under tempered glass should be removed by lifting the nearest corner and using a dust removal sticker. The dust particle must be eliminated before reapplying pressure. Touching the adhesive layer should be avoided because oils can reduce bonding strength.
Is Tempered Glass Easier to Install Than Film Protectors?
Tempered glass is generally easier to install on the iPhone 17 Pro because the rigid structure maintains alignment during application. Flexible film protectors shift more easily and often require additional adjustments. As a result, tempered glass remains the preferred choice for most smartphone owners.
Conclusion
Installing a screen protector on iPhone 17 Pro without bubbles requires a clean display, proper dust removal, accurate alignment, and controlled application. Most installation problems can be prevented by preparing the workspace carefully before opening the screen protector package.
The best results come from cleaning the iPhone 17 Pro display thoroughly, removing every dust particle, using bright lighting, and lowering the tempered glass slowly. Consequently, following these steps greatly increases the chances of achieving a professional-looking, bubble-free installation on the first attempt.

Oluremi Olaoye is a professional driver and technology content contributor based in Ondo, Nigeria. As the founder and primary voice behind Gizmosum, Remi leverages practical, daily experience to help users navigate the complexities of digital banking and consumer electronics. With a specialized focus on mobile hardware and SEO strategy, his work provides reliable guides and technical insights designed to simplify the ever-shifting technological era for a global audience.